Master Equipment FlashDry Stand Dog Dryers
Free Shipping with Promo Code DRSHP
Free Breathe Healthy Bones & Paw Print Mask with Purchase of this Dryer. A $17.00 value!


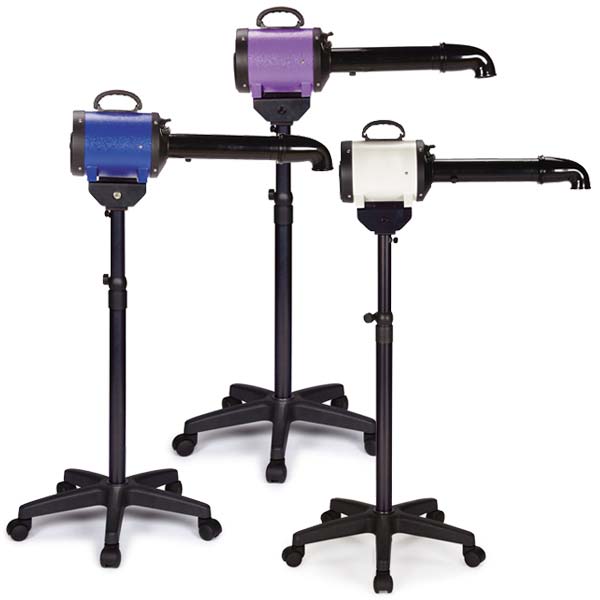


Convenience and versatility will make this Master Equipment™ FlashDry Stand Dryer a favorite in the grooming shop. The custom airflow and temperature control lets you comfortably dry pets of all coat types.
- Flexible 36" hose that stretches to 66" when in use
- Stand adjusts from 35" to 60" and rolls smoothly on five casters
- Includes three concentrator nozzles
- Easily converted to a hands-free dryer using the included hands-free arm with swivel nozzle
Items may be combined for quantity discounts.
Air Volume: 80.8 CFM
Air Speed: 4724 CFM
Heat: No
Motor: 1.5 HP
Amps: 12.5
Watts: 1,400
Cord Length: 9'
5 legged base is 22" diameter and 5" high with casters.
All hardware parts are in place where they should be used.
Parts List: Four Rounded Screws/Dryer Feet (Part L) are used to attach feet to the dryer, and are in place on the underside of the dryer body. Remove feet with their screws, sit dryer on stand bracket, and reattach feet to hold dryer in place on stand. Parts H, I, J and K are attached to the lower end of Bottom Pole (Part A). There is no longer a bag of hardware shipped with the dryer. All hardware parts are in place where they should be used.
Master Equipment FlashDry Dryer Carbon Brush Replacement Instructions
- Remove screws from the front end cap (with the dryer fitting). Allow the endcap to remain attached during maintenance.
- Remove the motor brace by removing the two screws on either side of the housing.
- Remove the single screw holding the circuit board in place and pull it out of the housing.
- Remove the motor from the housing and set the motor aside. Remove the rubber noise buffer from the bottom of the motor and set aside. If it does not come out with the motor, it may be left in the housing.
- A single set screw holds the carbon brush in place on the motor. Remove the screw to free the brush housing.
- There is a copper wire soldered to each side of the carbon brush. Either break the solder point or cut the wire very close to the solder t remove the brush.
- Put a new carbon brush in place and replace the screw to hold it in position.
- Resolder the wires to the brush housing.
- Repeat with second carbon brush on the opposite side of the motor.
- Reattach circuit board to the inside of the housing, making sure the plastic backing is almost at the edge of the housing. If heat shield has shifted, replace it properly in position by lining up the small hole for the circuit board in the outer housing and liner.
- Replace rubber noise buffer if it has come off the motor by placing it in the dryer housing with the flat side down.
- Replace the motor, pushing it fully down into the rubber noise buffer.
- Replace the motor brace.
- Replace the endcap, lining up the screw holes.
- Insert the screws to hold the endcap on.
Download Specifications (PDF File)
Convenience and versatility will make this Master Equipment™ FlashDry Stand Dryer a favorite in the grooming shop. The custom airflow and temperature control lets you comfortably dry pets of all coat types.
- Flexible 36" hose that stretches to 66" when in use
- Stand adjusts from 35" to 60" and rolls smoothly on five casters
- Includes three concentrator nozzles
- Easily converted to a hands-free dryer using the included hands-free arm with swivel nozzle
The Master Equipment™ FlashDry Stand Dryer is available in Ivory, Blue, and Purple styles to color coordinate any grooming salon.
Items may be combined for quantity discounts.
Air Volume: 80.8 CFM
Air Speed: 4724 CFM
Heat: 55˚-140˚
Motor: 1.5 HP
Amps: 12.5
Watts: 1,400
Cord Length: 9'
5 legged base is 22" diameter and 5" high with casters.
All hardware parts are in place where they should be used.
Parts List: Four Rounded Screws/Dryer Feet (Part L) are used to attach feet to the dryer, and are in place on the underside of the dryer body. Remove feet with their screws, sit dryer on stand bracket, and reattach feet to hold dryer in place on stand. Parts H, I, J and K are attached to the lower end of Bottom Pole (Part A). There is no longer a bag of hardware shipped with the dryer. All hardware parts are in place where they should be used.
Download Assembly Instruction (PDF file)
Master Equipment FlashDry Dryer Carbon Brush Replacement Instructions
- Remove screws from the front end cap (with the dryer fitting). Allow the endcap to remain attached during maintenance.
- Remove the motor brace by removing the two screws on either side of the housing.
- Remove the single screw holding the circuit board in place and pull it out of the housing.
- Remove the motor from the housing and set the motor aside. Remove the rubber noise buffer from the bottom of the motor and set aside. If it does not come out with the motor, it may be left in the housing.
- A single set screw holds the carbon brush in place on the motor. Remove the screw to free the brush housing.
- There is a copper wire soldered to each side of the carbon brush. Either break the solder point or cut the wire very close to the solder t remove the brush.
- Put a new carbon brush in place and replace the screw to hold it in position.
- Resolder the wires to the brush housing.
- Repeat with second carbon brush on the opposite side of the motor.
- Reattach circuit board to the inside of the housing, making sure the plastic backing is almost at the edge of the housing. If heat shield has shifted, replace it properly in position by lining up the small hole for the circuit board in the outer housing and liner.
- Replace rubber noise buffer if it has come off the motor by placing it in the dryer housing with the flat side down.
- Replace the motor, pushing it fully down into the rubber noise buffer.
- Replace the motor brace.
- Replace the endcap, lining up the screw holes.
- Insert the screws to hold the endcap on.
Download Ivory Color Specifications (PDF File)
Download Purple Color Specifications (PDF File)
Download Blue Color Specifications (PDF File)
Shipping Info: This item is not eligible for free or discounted shipping. This item qualifies for Free Shipping with the purchase of $2000 or more of select Master Equipment & ProSelect Equipment.
| Brand | Master Equipment |
|---|---|
| Product Grouping | Own Brand |
| UOM | EA |
| ERP Status | Active |